讓架在 Netlify 上的網站發文同時向 Google 要求為新頁面建立索引! - 使用 Netlify Functions 串接 Google Indexing API

前言

自從從 Medium 換過來自架部落格後,SEO 的事情也都得自己處理。但雖然說是「處理」,也只是做一些基本的設定而已,例如裝個 Search Console、提交 sitemap(但其實使用的靜態網站生產器 Hexo 就已經有做到自動生產、更新 sitemap)。唯一的手動作業就是每次發表新文章後,為了加快 Google 索引到新文章頁面的速度,我都還是會進到 Search Console 後台,手動輸入頁面網址要求建立索引(網址審查>測試線上網址>建立索引)。

身為一個能夠自動就不手動的懶人,突然想到之前曾在公司專案中使用過 Google Indexing API 提交要加入索引的網址,那我應該也可以來幫我的部落格串看看吧?

在尋找方法的過程中,雖然原本就是使用 Netlify 架站,但一年前的記憶有點模糊(可能也是複製貼上的關係),裡面很多功能其實也沒碰過,中途不少次因為遇到某種限制而又改變原本的做/解法,覺得這個過程也是學習到了不少,或是有機會為其他人避坑(?),因此有了這篇文章。

實作

初步規劃

這個功能的流程其實非常簡單,就是——發表文章後(deploy 成功)馬上觸發打 Google Indexing API 的程式。

首先需要思考的問題是,要如何接收 deploy 完成的訊息? 以及 「打 Google Indexing API 的程式」要在哪裡執行?

第一個想法是:看看 Netlify 在 deploy 成功後,有沒有什麼事件可以監聽。

於是搜尋到了官方文件關於 Deploy notifications 的說明,有支援多種接收通知的方式,Slack、email、webhook 等等。看起來比較適合的方式可能是透過 webhook,另外起一個 http server 並註冊一個 endpoint,server 一接收到 request 就立刻打 Google Indexing API。 但這麼一來,就還得另外 run 一個 http server,為了完成這個小任務還得再額外開一個服務,總覺得哪裏怪怪的。所以後來又找了一下有沒有其他更適合的做法,結果就看到了 Netlify Functions。

什麼是 Netlify Functions

Netlify Functions 是 Netlify 提供的一個類似 aws lamda 的功能(實際上也是基於 aws lamda 去實現的),可以輕易地部署 serverless 的服務。

然而 functions 都是基於專案(也就是透過 Netlify 所構建的網站),一個專案底下可以有多個 functions,這些 functions 需要被放在特定資料夾下面才會一同跟著專案被部署。(預設的資料夾位置在 YOUR_BASE_DIRECTORY/netlify/functions/,可以自行透過設定更改)

而這些部署在線上的 functions,都可以藉由特定的路由去觸發執行。 例如,一個用 JavaScript 寫的 functions 檔案名為 hello.js,被放在 netlify/functions/ 底下,完整路徑是:

YOUR_BASE_DIRECTORY/netlify/functions/hello.js

對應的路由就是:

BASE_URL_OF_YOUR_SITE/.netlify/functions/hello

只要戳這個 endpoint,隨便一種 Http Method 都可以,就能觸發這個 function。

📝 Note: 目前 functions 支援的程式語言只有 Typescript、JavaScript 以及 Golang 。

但接著又想到一件事,既然 functions 都是在專案底下,那他是否能透過某種方式監聽到專案的部署成功事件,只要專案一部署成功,就自動 call 這個 function,也不需要設定 webhook url 了?答案是可以的,Netlify 提供了一系列的 triggers,只要將 functions 按照事件名稱命名,就會在該事件發生時,直接執行同名 function。事件當中當然也包括部署成功事件 deploy-succeeded ,所以只要將 function 命名為 deploy-succeeded,function 就會在專案部署完成時被執行。

使用 Netlify Functions

總算進入到實作的環節啦!在這邊會使用 Golang 進行實作。 首先,在專案底下新建檔案 netlify/functions/deploy-succeeded/deploy-succeeded.go

📝 Note: 由於使用 Golang,一個 function 會視作為一個 Go module,裡面包含一個有 main function 的檔案,所以需要用資料夾來分層。但如果使用 JS 就不需要資料夾分層,一個檔案就是一個 function。

以下是官方文件提供的 function 範本:

 1
 2
 3
 4
 5
 6
 7
 8
 9
10
11
12
13
14
15
16
// ./netlify/functions/deploy-succeeded/deploy-succeeded.go
package main

import (
  "github.com/aws/aws-lambda-go/events"
  "github.com/aws/aws-lambda-go/lambda"
)

func handler(request events.APIGatewayProxyRequest) (*events.APIGatewayProxyResponse, error) {
  // 這邊是 function 的邏輯
}

func main() {
  // 這塊不需要動
  lambda.Start(handler)
}

想要先測試看看,是否這個 function 真的會在每次部署完成後被觸發執行,也順便看看收到的 request payload 會是什麼,所以在 handler 方法裡面加上:

1
2
3
4
func handler(request events.APIGatewayProxyRequest) (*events.APIGatewayProxyResponse, error) {
  // 試著把 request.Body 印出來
  fmt.Println(request.Body)
}

結果發現真的有被執行,我們可以到 Netlify 後台去看 function 的 log。進入 https://app.netlify.com/sites/{your_site}/functions ,點選剛剛 deploy 的 function: Untitled

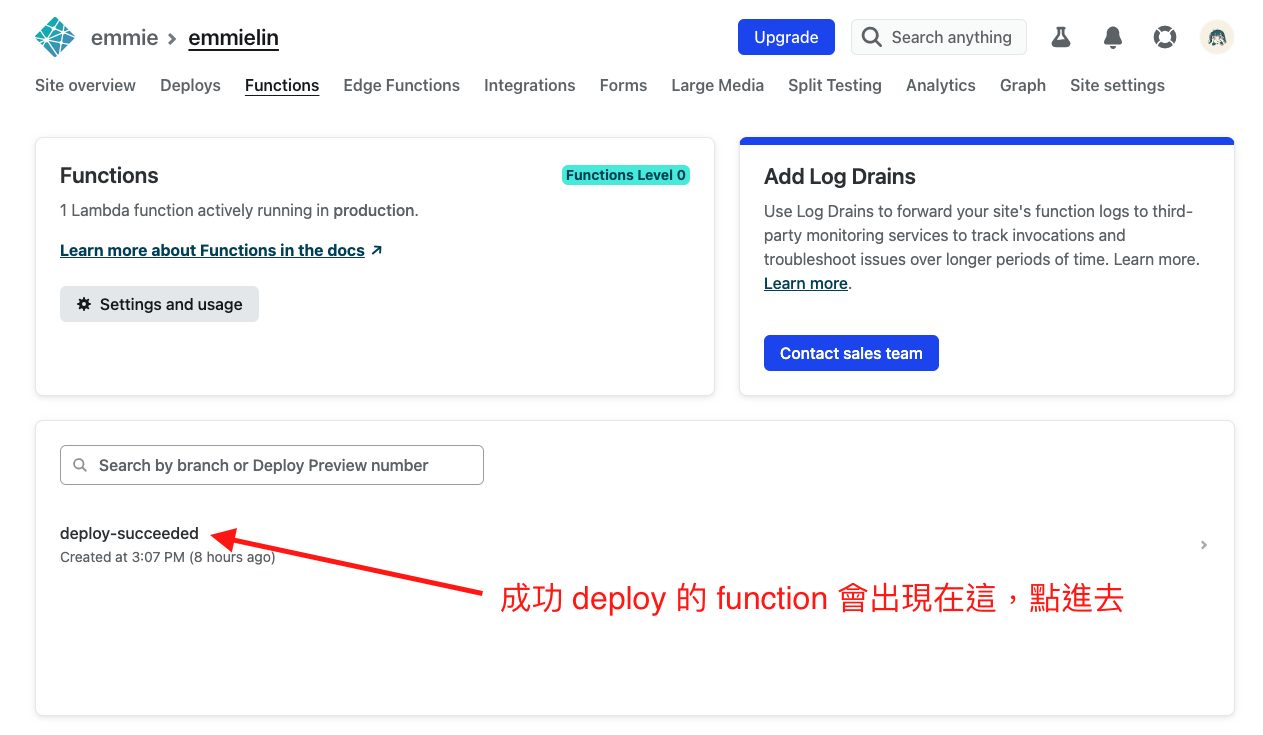
就可以進到該 function 的頁面瀏覽 log: Untitled

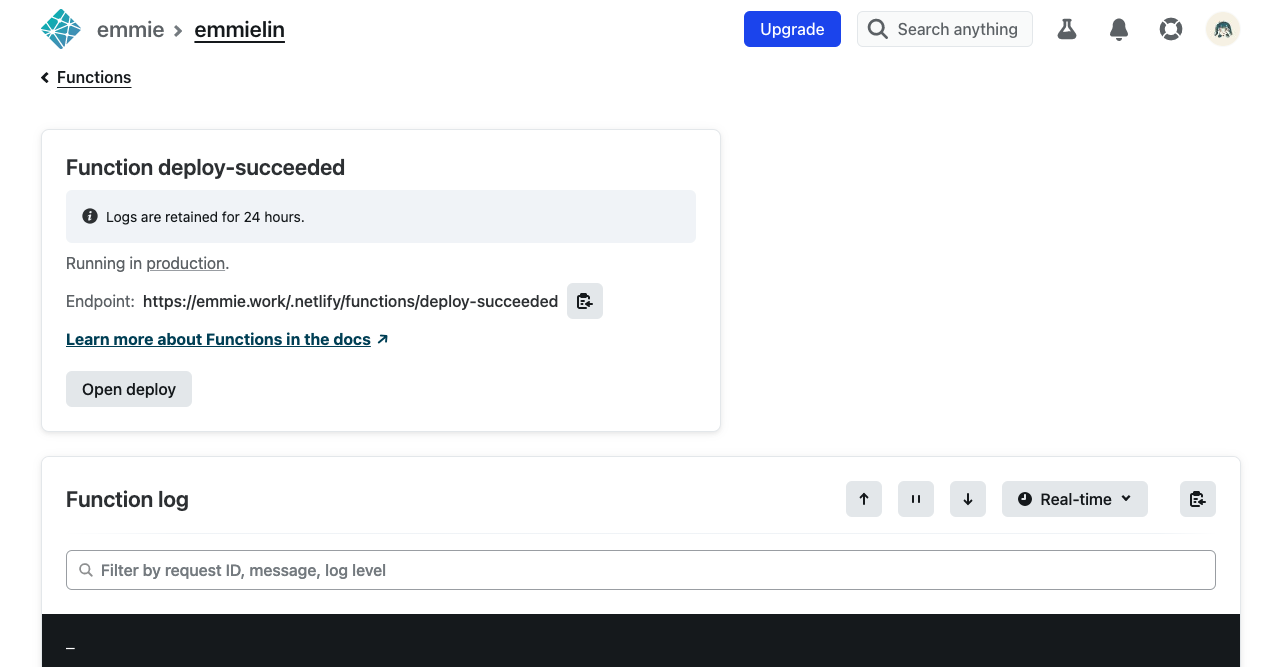
log 印出來的內容大概長這樣,但因爲資料有點太多,這邊就沒貼完整內容:

 1
 2
 3
 4
 5
 6
 7
 8
 9
10
11
12
13
14
15
16
17
18
19
20
21
22
23
24
25
26
27
28
29
30
31
32
33
34
35
36
37
38
39
40
41
42
43
44
45
46
47
48
49
50
51
52
53
54
55
56
57
58
59
60
61
62
63
64
65
66
67
68
69
70
71
72
// 敏感資訊有用*號遮罩
{
    "payload": {
        "id": "63f9e14********6916d",
        "site_id": "********-6b6d-4df7-a413-********",
        "build_id": "63f9e144bb8728000846916b",
        "state": "ready",
        "name": "emmielin",
        "url": "https://emmie.work",
        "ssl_url": "https://emmie.work",
        "admin_url": "https://app.netlify.com/sites/emmielin",
        "deploy_url": "http://main--emmielin.netlify.app",
        "deploy_ssl_url": "https://main--emmielin.netlify.app",
        "created_at": "2023-02-25T10:21:56.064Z",
        "updated_at": "2023-02-25T10:22:11.735Z",
        "user_id": "************************",
        "error_message": null,
        "required": [],
        "required_functions": [],
        "commit_ref": "f3fb856c951b6979f22********90",
        "review_id": null,
        "branch": "main",
        "commit_url": "https://github.com/linxinemily/hugo-emmie-blog/commit/f3fb856c951b6979f22ffad191843dc831164690",
        "skipped": null,
        "locked": null,
    "log_access_attributes": {
            "type": "firebase",
            "url": "https://netlify-builds9.firebaseio.com/builds/63f9e144bb8728000846916b/log",
            "database": "netlify-builds9",
            "endpoint": "https://netlify-builds9.firebaseio.com",
            "path": "/builds/63f9e144bb8728000846916b/log",
            "token": "************************",
        },
        "title": "commit msg",
        // more info...
    },
    "site": {
        "id": "********-6b6d-4df7-a413-********",
        "site_id": "********-6b6d-4df7-a413-********",
        "plan": "nf_team_dev",
        "ssl_plan": null,
        "premium": false,
        "claimed": true,
        "name": "emmielin",
        "custom_domain": "emmie.work",
        "domain_suffix_branch": null,
        "domain_suffix_deploy_preview": null,
        "domain_aliases": [],
        "password": null,
        "password_hash": null,
        "sso_login": false,
        "sso_login_context": "all",
        "notification_email": null,
        "url": "https://emmie.work",
        "admin_url": "https://app.netlify.com/sites/emmielin",
        "deploy_id": "63f9e14********6916d",
        "build_id": "",
        "deploy_url": "http://main--emmielin.netlify.app",
        "state": "current",
        "screenshot_url": null,
        "created_at": "2022-07-18T16:18:18.628Z",
        "updated_at": "2023-02-25T10:22:11.738Z",
        "user_id": "************************",
        "error_message": null,
        "ssl": true,
        "ssl_url": "https://emmie.work",
        "force_ssl": true,
        "ssl_status": null,
        "max_domain_aliases": 100,
        // more info...
    }
}

如果要在 local 開發 function 的話,可以安裝 Netlify CLI,在專案底下跑:

$ netlify functions:serve

成功跑起來的話預設會在 9999 port: Untitled

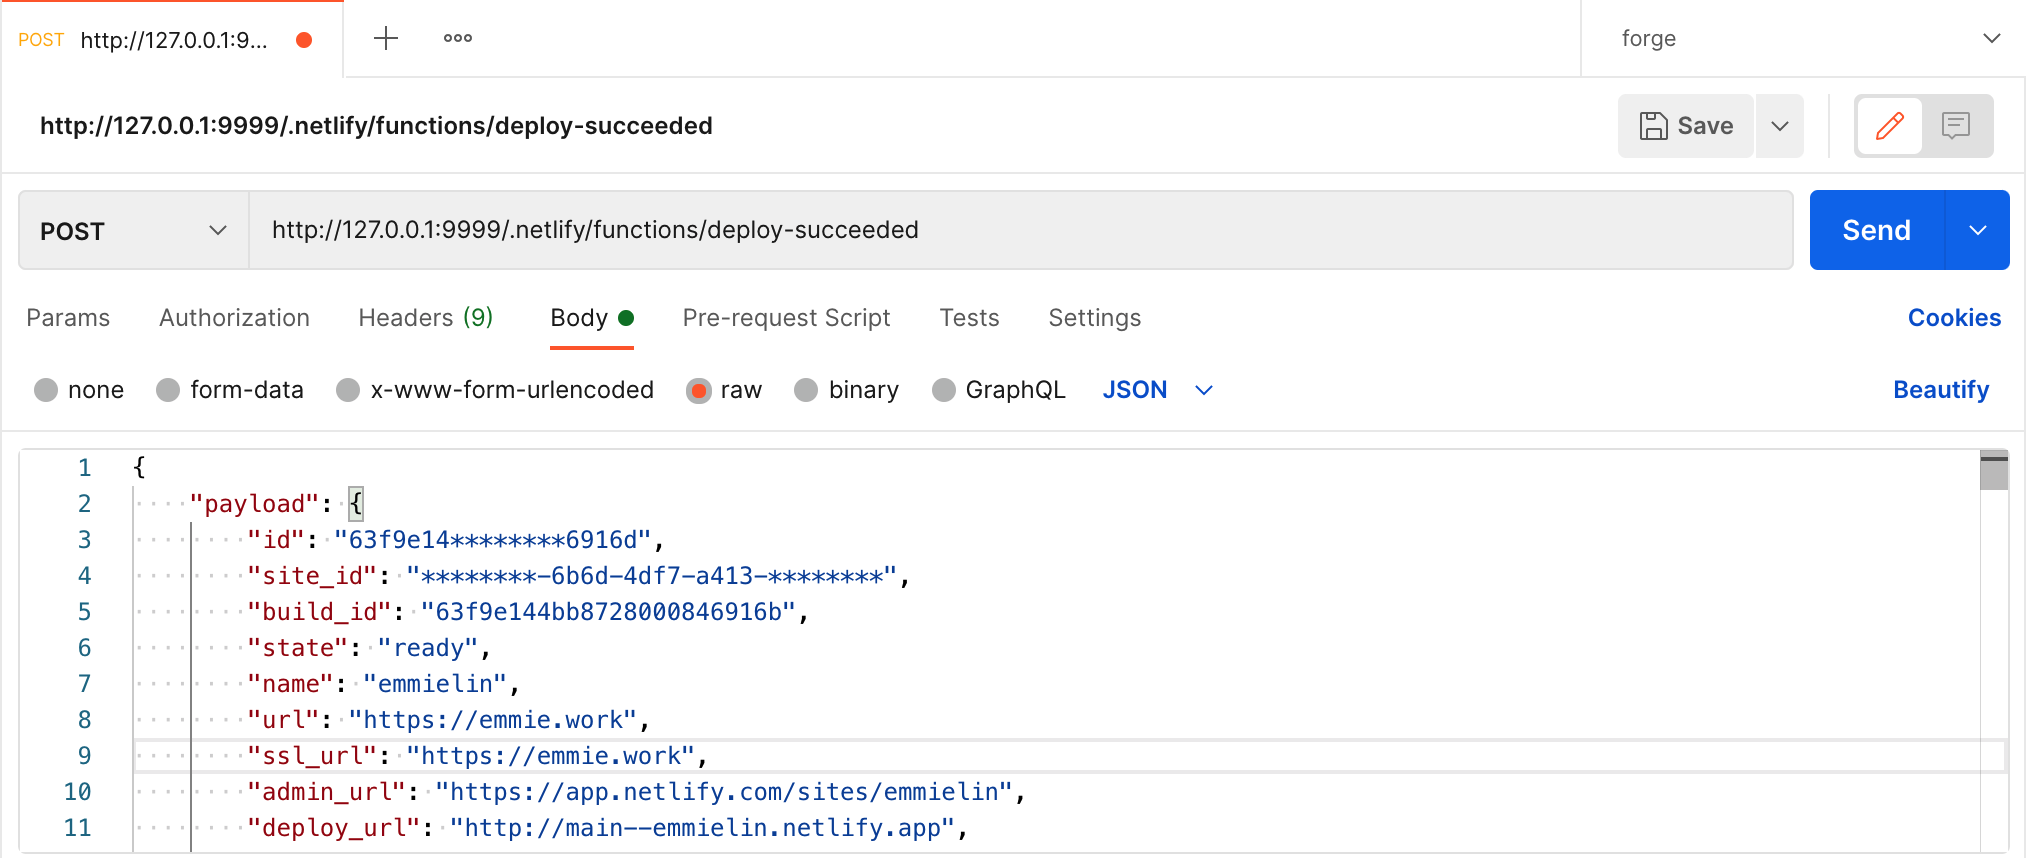
然後就可以用 Postman 打 function 的 endpoint: Untitled

如何取得新文章 URL

確定 Netlify Functions 可以達成我們的需求後,在串接 Indexing API 前,總得知道該怎麼把新文章的網址推送給 Indexing API 吧!

原本的想法是,由於 Hugo 每次 build 的時候都會自動幫我們更新 sitemap 檔案,因此或許可以透過新舊 sitemap 的比對檢查是否有新增的 page url,如果有的話就把這些 url 推送給 Google Indexing API。但問題就來了,要有舊檔案可以拿出來比較,那就得在每次執行這個 function 完存下當前的 sitemap 檔案,這樣才能在下一次執行 function 時,取得上次存下的 sitemap 檔案與新的做比對。然而,在 functions 當中無法對專案進行檔案的讀寫,(有人發問被官方回覆在此),這麼一來還得另外找一個外部空間例如 AWS S3 之類的去存放這個檔案,覺得有點太麻煩了,而且這個功能應該也不需要做到這麼自動化(畢竟暫時只有我要用)。

所以後來發現 payload 當中有一個欄位 payload.title 是每次 commit 的訊息,因爲 Netlify 的設定是一 push commit 就會觸發 deploy,所以每次 deploy 一定都會有一個 commit msg。於是想到可以直接利用 commit msg 帶入新文章的 slug,在 payload 中取得 payload.title 解析出 slug 字串後組出新文章的網址。雖然好像有點土法煉鋼,不過感覺還挺可行的。

串接 Google Indexing API

確定資料的取得都沒問題後,接下來就是進入串接 Indexing API 的部分了。完成官方文件事前準備的步驟「為用戶端建立專案」、「建立服務帳戶」、「將服務帳戶新增為網站擁有者」之後,就可以根據要使用的程式語言安裝 google api sdk 程式,這邊選擇使用 Golang 的 sdk

剛剛第二個步驟「建立服務帳戶」時,下載了一個金鑰檔案(按照建議檔案類型選擇JSON)存在本地電腦裡,使用這個金鑰的方式很簡單,本地端開發的話,只要在命令列宣告個環境變數:Ref

$ export GOOGLE_APPLICATION_CREDENTIALS="KEY_PATH" //KEY_PATH 取代為剛剛下載的金鑰檔案路徑

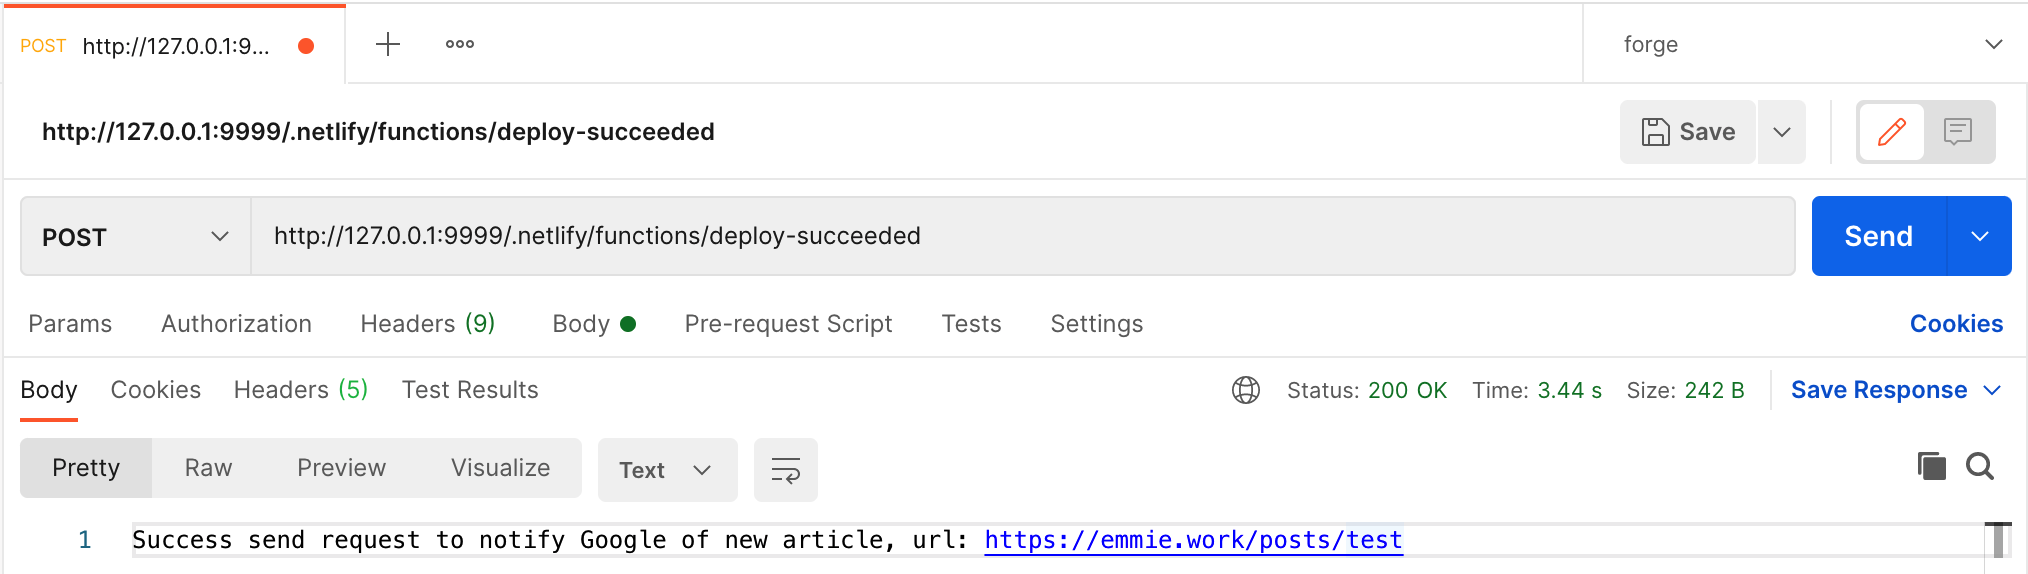
先測試一下串接有沒有成功,帶個測試網址發送看看:

 1
 2
 3
 4
 5
 6
 7
 8
 9
10
11
12
13
14
15
16
17
18
19
20
21
22
23
24
25
26
27
28
29
30
31
32
33
34
35
36
37
38
39
40
41
42
43
44
// ./netlify/functions/deploy-succeeded/deploy-succeeded.go
package main

import (
 "context"
 "fmt"
 "log"

 "github.com/aws/aws-lambda-go/events"
 "github.com/aws/aws-lambda-go/lambda"
 "google.golang.org/api/indexing/v3"
)

func handler(request events.APIGatewayProxyRequest) (*events.APIGatewayProxyResponse, error) {
 ctx := context.Background()
 indexingService, err := indexing.NewService(ctx)

 if err != nil {
  log.Fatalln(err)
 }

 fullUrl := "https://emmie.work/posts/test" //先寫死一個測試網址
 notification := &indexing.UrlNotification{
  Url:  fullUrl,
  Type: "URL_UPDATED",
 }
 res, err := indexingService.UrlNotifications.Publish(notification).Do()

 if err != nil {
  log.Fatalln(err)
 }

 log.Println(res.ServerResponse)

 return &events.APIGatewayProxyResponse{
  StatusCode: 200,
  Body:       fmt.Sprintf("Success send request to notify Google of new article, url: %s", fullUrl),
 }, nil
}

func main() {
 lambda.Start(handler)
}

在同個命令列 session 下剛剛的 netlify functions:serve 指令,看起來是 work 的。 Untitled

OK,問題又來了,當這段程式要放在 Netlify 上面跑時,難不成要把這個金鑰檔案也連同上傳到 github repo 嗎,聽起來有點不太安全,而且還記得剛剛提到 function 裡面無法存取專案當中的檔案,所以這條路也不可行。那該怎辦呢?後來看到有網友也有類似問題(但我突然找不到原發問連結),總之最後採用的方法是將環境變數的值改成金鑰 JSON 檔內容,然後在程式裡面取得環境變數的值後,透過 option 設定金鑰的值:

$ export GOOGLE_APPLICATION_CREDENTIALS='{
  "type": "service_account",
  "project_id": "emmie-hugo-blog",
  "private_key_id":"xxxxxx",
  //...
 }'
1
2
3
4
5
6
func handler(request events.APIGatewayProxyRequest) (*events.APIGatewayProxyResponse, error) {
 //...
 credentialJsonStr := os.Getenv("GOOGLE_APPLICATION_CREDENTIALS")
 indexingService, err := indexing.NewService(ctx, option.WithCredentialsJSON([]byte(credentialJsonStr)))
 //...
}

這樣一來,就能夠單純透過設定環境變數的值取代需要存取檔案的方式。但要在部署時加上這個變數,我們還得再做兩個動作,一是在 ./netlify.toml 檔案,設定環境變數的 KEY:

1
2
3
4
# ./netlify.toml
[context.production.environment]
   HUGO_ENV = "production"
   GOOGLE_APPLICATION_CREDENTIALS = "$GOOGLE_APPLICATION_CREDENTIALS"

二是到 Netlify 後台設定環境變數的值:
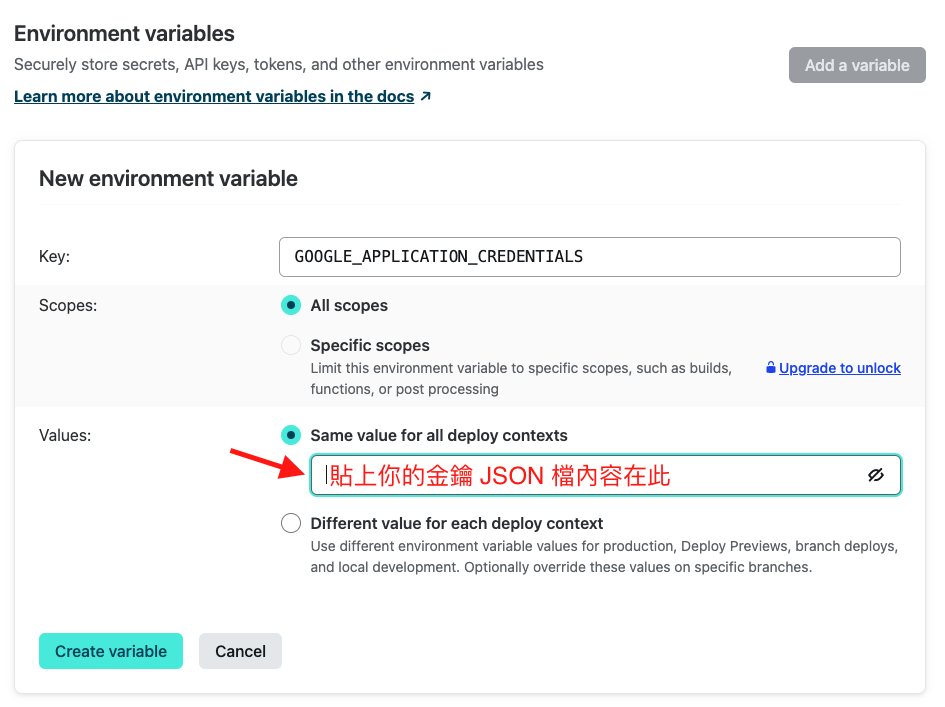
 Untitled

然後就大功告成了!!

這邊直接附上最後完成的 code: https://github.com/linxinemily/google-indexing-netlify-function/blob/main/deploy-succeeded.go

再來測試看看發一個 commit 然後 push:

git commit -m "new article: netlify-function-google-indexing-api" && git push

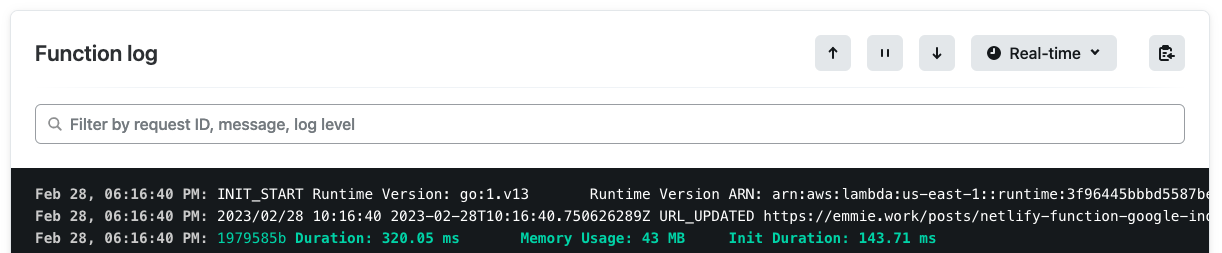
驗證一下是否有成功提交索引,到後台看 function 有沒有 log,有顯示代表成功: Untitled

後記

以上,大概就完成了 90% 的人工作業(剩下 10% 是要自己打 commit msg 的部分),不過也已經心滿意足了!比較大的收穫就是發掘了 Netlify Functions 這個不錯用的功能,以及重溫一下串 Google API 的回憶。 現在能想到唯一的缺陷是,當一次推多個 commit 時,由於 deploy 的 payload 只會有最新一個 commit 的相關資訊,所以如果這幾個 commit 都包含有一篇新文章,那就只有最後發的那個 commit 的文章會被提交索引,不過我寫文頻率沒有高成那樣所以應該是不太可能會遇到這種情況,所以就先略過了。剩下的部分就看未來有沒有遇到什麼使用上的困難再來優化吧!